Drive-Thru Headset Systems
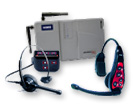
SYSTEM 6000
- My System 6000/6000A doesn’t detect vehicles. How can I get it working again?
- How do I change the outside volume on my System 6000/6000A?
- Video: How to change the language on an All-in-One Headset
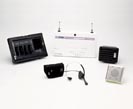
SYSTEM 400/900
- How do I change the outside volume on my System 400/900?
- How do I get the most life out of my AC400/900 batteries?
- How do I get the best performance from my AC400/900 battery charger?
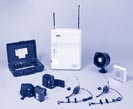
SYSTEM 2500
- My System 2500 doesn't detect vehicles. How can I get it working again?
- How do I change the outside volume on my System 2500?
- How do I get the most life out of my System 2500 batteries?
- How do I get the best performance from my System 2500 battery charger?
- The red " CHARGING " light on my battery charger never comes on.
What's the problem?
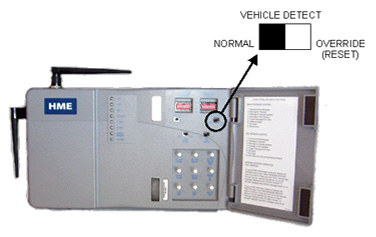
My System 6000/6000A doesn’t detect vehicles. How can I get it working again?
You may need to reset detection. Here's how: Be sure no cars are present at the order point when resetting. Locate the "RESET" switch behind the door on the right side of the base station. Slide the switch to the right (reset) for 10 seconds, then slide the switch back to the left (Normal). No cars should be at the order point when sliding the switch back to the left.
How do I change the outside volume on my System 6000/6000A?
Locate the "SPKR VOL OUTSIDE" control behind the door on the right side of the base station. Rotate the control clockwise to increase the outside volume, and counter-clockwise to reduce the outside volume.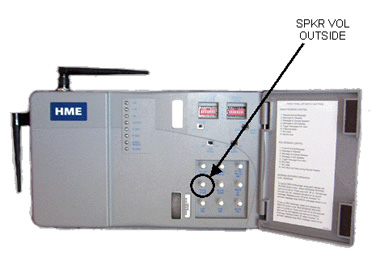
My System 400/900 doesn't detect vehicles. How can I get it working again?
You may need to reset detection. Here's how: Be sure no cars are present at the order point when resetting. Locate the "RESET" switch on the bottom of the base station. Press and hold the button to reset position for at least ten seconds. No cars should be at the order point when releasing the button.
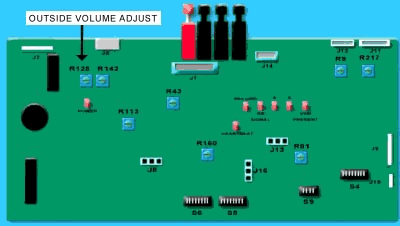
How do I change the outside volume on my System 400/900?
Open the front panel of the base station to access the electronics inside. Locate the Outside Volume adjustment wheel R128 on the large circuit board. Remove the colored paint from the wheel to reveal a smaller white slotted wheel. Adjust as needed with a screwdriver. Turn the wheel clockwise to increase volume. Be careful not to over torque the small white slotted wheel or you will damage it.
Outside Volume Adjustment for the System 400/900
(your voice going to outside customer)
How do I get the most life out of my AC400 batteries?
Proper care will significantly extend the life of your batteries. Here are some "battery facts" to help you get the most life out of your AC400/900 batteries. Batteries require approximately four hours to charge when fully depleted. Do not charge batteries until needed or charging time will be increased.*
The COM400 COMMUNICATOR® has a built-in low-battery indicator. When battery power is reduced to approximately five minutes of use, two beeps will begin to sound in your headset at five-second intervals until the Communicator shuts itself off. The COM900 will give a voice prompt saying "low battery" in the earpiece. When this happens, remove and replace the battery. HME's Nickel Cadmium (NiCd) batteries, when properly maintained, are designed for a minimum of 500 rechargeable cycles. When fully charged, batteries will last approximately six to eight hours.
- We recommend monthly cleaning of the battery contacts, Communicator contacts and charger battery contacts.
- To clean battery contacts, wet the tip of a cotton swab with rubbing alcohol and squeeze the excess alcohol from the swab. Wipe the metal contacts of each battery with the damp swab.
- A clean pencil eraser can also be used to clean contacts of battery or Communicator.
- Do not let metal contacts touch any metal object, or damage to batteries can occur. Never expose batteries to excessive heat.
- Contact your local waste control or HM Electronics, Inc. for proper disposal of old or damaged batteries. Batteries are composed of Nickel Cadmium.
How do I get the best performance from my AC400/900 battery charger?
Proper care will significantly extend the life of your batteries. Here are some "battery facts" to help you get the most life out of your AC400/900 battery charger. Be sure the proper 16-volt AC power adapter powers the battery charger. The charger should remain plugged in and turned on continuously. Do not plug the charger into a circuit that gets shut off at night.
To charge batteries, insert a battery in the charger. The red CHARGING light will begin to blink: 2 blinks on, 2 blinks off until the battery is discharged. After the battery is discharged, the charge LED light will stay on red continuously until the battery is fully charged whereupon the LED light will turn green indicating ready for use.
Charge batteries only when necessary. Unnecessary charging may decrease the life of your batteries. Do not remove batteries from the Communicator until they need recharging. Leave batteries in the Communicator with the power turned off when not in use. Keep the charger in a clean and dry location. We recommend monthly cleaning of the battery charger.
CAUTION: UNPLUG YOUR BATTERY CHARGER FROM
ANY POWER SOURCE BEFORE CLEANING.
To clean battery charger contacts, wet the tip of a cotton swab with rubbing alcohol and squeeze the excess alcohol from the swab. Allow contacts to dry before placing batteries in the charger.
My System 2500 doesn't detect vehicles. How can I get it working again?
You need to reset detection. Be sure no cars are present at the order point when resetting. Locate the "reset" switch on the front of the base station. Press and hold the button to the reset position for at least 10 seconds. No cars should be at the order point when releasing the button, and not for another 10 seconds thereafter.
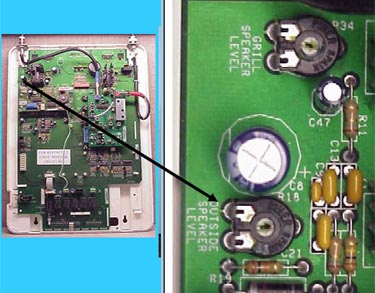
How do I change the outside volume on my System 2500?
Remove the front cover of the base station to access the electronics inside. Locate the Outside Volume adjustment wheel R18 on the large circuit board. Remove the colored paint from the wheel to reveal a smaller white slotted wheel. Adjust as needed with a screwdriver. Turn the wheel clockwise to increase volume.
Outside Volume Adjust Wheel for System 2500
How do I get the most life out of my System 2500 batteries?
Proper care will significantly extend the life of your batteries. Here are some "battery facts" to help you get the most life out of your AC2000 batteries.
Batteries require approximately 10 hours to charge with the AC2000 Battery Charger. When fully charged, batteries will provide 8 to 12 hours of active use. HME's Nickel Cadmium (NiCd) batteries, when properly maintained, are designed for a minimum of 500 rechargeable cycles. Replace batteries with fully charged batteries when the red light on the Communicator is dim or when you have trouble operating the Communicator.
NOTE: To prevent damage to the Communicator, be sure the "off/volume" control is in the "off" position before removing or installing a battery.
We recommend monthly cleaning of battery contacts. To clean battery contacts, wet the tip of a cotton swab with rubbing alcohol and squeeze the excess alcohol from the swab. Wipe the metal contacts of each battery with the damp swab. Do not let metal contacts touch any metal object, or damage to batteries can occur. Never expose batteries to excessive heat. Contact your local waste control or HM Electronics, Inc. for proper disposal of old or damaged batteries. Batteries are composed of Nickel Cadmium.
How do I get the best performance from my System 2500 battery charger?
Proper care will significantly extend the life of your batteries. Here are some "battery facts" to help you get the most life out of your AC2000 batteries.
Be sure the battery charger is powered by the proper AC power adapter:
- AC2000 - 20 VAC
- AC2000A - 16.5 VAC
The charger should remain plugged in and turned on continuously. Do not plug the charger into a circuit that gets shut off at night.
The charge indicator (red and green lights) changes from red to green when batteries have remained in the charger uninterrupted for 10 hours.
The light will change back to red from green, if:
- The AC power to the charger has been interrupted.
- Batteries are disturbed in their slots while charging.
Charge batteries only when necessary. Unnecessary charging may decrease the life of your batteries. Leave batteries in the Communicator with the power turned off when not in use. Do not remove batteries until they need recharging. Keep the lid of the charger open while charging batteries. Keep the charger in a clean and dry location. We recommend monthly cleaning of the battery charger.
CAUTION: UNPLUG YOUR BATTERY CHARGER FROM
ANY POWER SOURCE BEFORE CLEANING.
To clean battery contacts, wet the tip of a cotton swab with rubbing alcohol and squeeze the excess alcohol from the swab. Wipe the metal contacts of each battery with the damp swab. Allow contacts to dry before placing batteries in the charger.
The red "CHARGING" light on my battery charger never comes on.
What's the problem?
If the "CHARGING" light does not come on, check to see if the charger is unplugged. Check the outlet for power or plug the unit into another known working outlet.
Drive-Thru Timer Systems
SYSTEM 20
- How do I change the time on my System 20 Timer?
- I just replaced the paper in my System 20 Timer printer, and now it doesn't print. What happened?
- My System 20 Timer printer doesn't advance paper or print reports. What can I do?
Programming System 20 Timer
- Automatically Print Reports
- Basic Operating Parameters
- Change Alert Tones
- Change Current Time
- Change Dayparts or Target Times
- Change Lockout Code
- Change Main Display
- Common Wiring Configuration
- Manually Print Reports
- Time Events
SYSTEM 30
- How do I change the time on my System 30 Timer?
- I just replaced the paper in my System 30 Timer printer,
and now it doesn't print. What happened? - My System 30 Timer printer doesn't advance paper
or print reports. What can I do?
Programming System 30 Timer
- Add Manager's Code
- Adjust Remote Tone Level
- Change Date and Time
- Change Dayparts
- Change Service Goals
- Change Shifts
- Disable Display Tone
- Identify Firmware Version
- Print Reports
- Print Settings
- Schedule Auto Reports
How do I change the time on my System 20 Timer?
Use the keypad entry on the front panel of the timer. Press the ENTER key. If the LCD display asks for a lockout code, enter it. If there is no lockout code programmed, press the ENTER key without entering any numbers. When the display says "Enter command or ESC," press the SETUP key.
If the display says "Menu Setups," go to Menu Setups below.If the display says "Timer Configuration," go to Timer Configuration below.
Menu Setups:
Press 1 and ENTER. The display should read "System Setup, Enter Date." If the date is correct, press ENTER. If it's not, enter the correct date and press ENTER. The display should read "System Setup, Enter Time." You must enter the time in 24-hour time. Enter the time in hours, minutes and seconds. If the time is correct, press ENTER without entering any numbers.
The remainder of this setup menu will ask for information that does not have to be changed. Press the ENTER key after each display until the display "System Setup Changes?" disappears, Enter 1=Yes, 0=No." Press 0 and then ENTER. Now the display should read "Enter ESC or (0-8)." Press ESC twice. You will be out of the Setup menu.
Timer Configuration:
Press 2 and ENTER. The display should read, "System Setup, Enter Date." If the date is correct, press ENTER. If it's not, enter the correct date and press ENTER. The display should read, "System Setup, Enter Time." You must enter the time in 24-hour time. Enter the time in hours, minutes and seconds. If the time is correct, press ENTER without entering any numbers.
The remainder of this setup menu will ask for information that does not have to be changed. Press the ENTER key after each display until the display says "Timer Configuration." Press 0 and ENTER. The display will say "Enter command or ESC." Press ESC. You will be out of the Setup menu.
I just replaced the paper in my System 20 Timer printer, and now it doesn't print. What happened?
It's probably the wrong kind of paper or it's been loaded wrong. Our printers use heat-sensitive paper that will only print on one side. Most POS thermal papers will not work in this timer. Try loading the paper the other way. The paper should turn black when exposed to heat.
My System 20 Timer printer doesn't advance paper or print reports.
What can I do?
The printer is probably jammed with paper. If the roll of paper is too large, the motor can't pull it through, and the paper will jam. Be sure you are using the correct paper for this timer. Then very carefully remove any paper that may still be in the printer. Inspect rollers for small bits of paper. Do not force anything into the printer to remove paper; this may damage the unit and cause the warranty to be voided.
If this doesn't work, check the printer settings in the setups. Here's how:
Enter lockout code if there is one. If not, press ENTER. Press "Setup." If display reads "menu setups," press 0. If it reads "timer configurations," press 1. Display should indicate the internal printer is selected (1 is flashing). If not, press 1 and press ENTER.
How do I change the time on my System 30 Timer?
Daylight Saving Time begins the second Sunday in March and ends the first Sunday in November. During this time, it may be necessary to manually adjust the time. Here’s how
Press the SET UP SYSTEM key. Enter Manager's access code, if required, and press ENTER. Press + or - until the front panel display shows
"System Setup" press ENTER. Press + or - until "Set Date & Time" appears on the display and press ENTER. Press + or - until the correct month is displayed.
Press ENTER to move to the date field. Press the number keys to enter the correct day of the month, press ENTER and then enter the correct year. Press ENTER. Press the number keys to enter the correct time (Hours:Minutes). Press the + or - keys to select A(AM) or P(PM). Press ENTER. Press the + or - keys to turn off the automatic adjustment for Daylight Savings Time. "NO" will be displayed on the screen. Press ENTER.
The system will accept the changes. Then press EXIT and the system will return to the "Set Date/Time" display. Press EXIT. The system will return to the "System Setup" display. Press EXIT again. The system will return to standby mode.
I just replaced the paper in my System 30 Timer printer, and now it doesn't print. What happened?
It's probably the wrong kind of paper or it's been loaded incorrectly. HME printers use heat-sensitive paper that will only print on one side. Try loading the paper the other way. To test if the paper is thermal, scrape your fingernail across the print side; it should make a dark line.
Note: Most POS thermal papers will not work in this timer. Our timer's printer requires a specific size, type and weight of paper. Other paper may work temporarily but can cause damage to the printer. HME timer paper (part number 428005) is the only paper approved for use with the System 30 Timer.
My System 30 Timer printer doesn't advance paper or print reports.
What can I do?
Answer 1: The timer may need to be reset. Open up the timer and unplug the 6-pin J2 connector (smaller green plastic connector at the top of the circuit board), wait 5 seconds, and then plug it back in.
Note: Several problems (such as a frozen LED display, keypad or printer) may occur simultaneously if the store experiences an interruption in power. Resetting power this way may correct one or all of these problems.
Answer 2: The printer may have a paper jam. If the roll of paper is too large, the motor can't pull it through and the paper will jam. Very carefully remove any paper that may still be in the printer. Inspect the rollers for small bits of paper. Do not force anything into the printer to remove paper; this may damage the unit and cause any warranty to be voided.
Answer 3: HME timers require a specific size, type and weight of paper. Other paper may work temporarily but can cause damage to the printer. HME timer paper (part number 428005) is the only paper approved for use with the System 30 Timer.